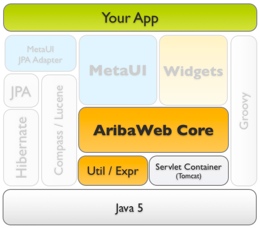
Part I. AribaWeb Core
 In this section we'll introduce the key concepts building an AribaWeb Core + Widgets
application. We'll build the app up as follows:
In this section we'll introduce the key concepts building an AribaWeb Core + Widgets
application. We'll build the app up as follows:
- Build "Hello World"
- Build a Simple Guest Book
- Enhance the Guest Book with tabs and datatables
- Build and use a Reusable component
- Add page transitions
Much of what we build here, and in Part II, is covered in overview in the screencast
AribaWeb: App Building Tutorial. We recommend that you view
this (and perhaps Setting up IntelliJ IDEA for AW Development)
to get an overview prior to digging in here.
This journey will expose us to the following AribaWeb facilities:
Project Source Structure
Let's start by building the minimal AribaWeb application: HelloWorld. 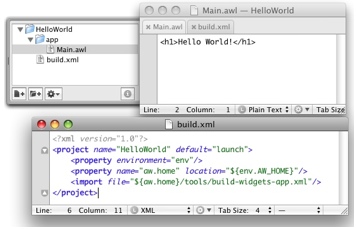
We can see that the entire project for this application consists of two files:
- A six line ant build file:
build.xml
- A single line template file,
Main.awl
We can run build and run this application from this project within an appropriately configured IDE.
Alternatively, we can open a shell and (assuming we have our AW_HOME, ANT_HOME, and PATH set up correctly)
from the command prompt run ant launch.
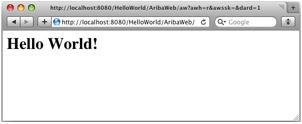
The project will build, the app server will be launched, and the default browser will open to
http://localhost:8080/HelloWorld/AribaWeb. We should see:
What happened?
The Ant file packaged our project into an "unpacked WAR" directory. This included our template and
the AribaWeb jars and resources necessary to run our app.
The Tomcat app server launched, serving this application
Upon the browser request to http://localhost:8080/HelloWorld/AribaWeb Tomcat directed the request
to the HelloWorld application, and invoked the AribaWeb servlet.
The AribaWeb servlet initialized the (default) application (AWServletApplication), and returned the
default "component", Main. (This component was found by the AWResourceManager in the app/ directory)
AWL Templates
We can see that our content comes from Main.awl. The .awl (AribaWeb Language) template is, in its most
degenerate form, HTML. However, more typically it contains references to AWComponent
(and AWElement) elements, thereby defining a component hierarchy.
If we do a "View Source" in our browser we'd see that our Hello World page really isn't well formed HTML (no doctype, html, head, or body tags). We can fix this by wrapping our content in a "PageWrapper"
<a:PageWrapper hasForm="$true">
    <h1>Hello World!</h1>
<a:PageWrapper>
(You don't need to restart or recompile the application - save the change in your editor and refresh
your browser).
The page still looks this same in the browser, but if you "View Source" again, now you'll see
your content wrapped in a proper HTML structure. (You'll also see that some JavaScript libraries in support
of AW's "Auto AJAX" capability have been added as well, but more on that later...).
This all happened because we introduced a Component Reference to the AWPageWrapper component in our
template, and passed our content as Component Content in its body. AWPageWrapper introduced various
other components onto our page and also included our body content as well.
Now this may seem similar to what happens with "includes" or "tag libraries" in any number of other web
frameworks. As we'll soon see, there's actually much more going on than meets the eye...
Components
Our Main.awl is actually more than just a "template": it's defining a Component (albeit one with just
the default AWComponent behavior). Components can be "stateless" or "stateful" (page level components
are always stateful) and manage the state and actions associated with their template.
Let's enhance our app to make our greeting more personalized by declaring a proper class to pair with our template.
First, we'll add a class Main.java right along side Main.awl:
package app;
import ariba.ui.aribaweb.core.AWComponent;

public class Main extends AWComponent {
    public String _userName = "Anonymous";
}
Then, in Main.awl, we'll change our greeting to read:
<a:PageWrapper hasForm="$true">
    <h1>Hello <a:String value="$userName"/>!</h1>
</a:PageWrapper>
We can see that "Anonymous" is somehow now getting pulled from our component's _userName variable.
Let's make this interactive:
<a:PageWrapper hasForm="$true">
    <h1>Hello <a:String value="$userName"/>!</h1>

    Who are you? <a:TextField value="$userName"/>
    <a:SubmitButton/>
</a:PageWrapper>
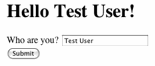 Now we have a UI where typing a new name in the text field and pressing "Submit" will update the greeting.
You'll notice that we didn't have to write any code to handle the submit action, no code to decode (or
even name) form values. How did this work? It's time to talk about...
Now we have a UI where typing a new name in the text field and pressing "Submit" will update the greeting.
You'll notice that we didn't have to write any code to handle the submit action, no code to decode (or
even name) form values. How did this work? It's time to talk about...
Bindings and Field Paths
AribaWeb uses declarative, bidirectional bindings to communicate between components.
AWTextField, for instance, both pulls from its value binding (when rendering), and pushes
to that binding when accepting posted form values.
Note also that AWComponents completely encapsulate form value naming: the AWTextField took care
of naming the HTML INPUT element that it generated, and it's responsible for looking up that input
when it comes back in form post.
Each component defines its own API in terms of the named bindings that it supports. (Components also
can take element content as a form of argument). The "parent component" using the bindings may use
a variety of types of binding expressions:
Field Paths: e.g.: "$userName" or "$project.costCenter.budget" or "$delete"
FieldPaths use the FieldValue protocol to get and set property values from objects.
FieldValue is similar to JavaBean accessors, but somewhat more flexible and performant.
The default implementation of FieldValue for POJOs will handle "gets" on "someKey" by looking for
- a public accessor named someKey() _someKey() or getSomeKey()
- a public field named someKey or _someKey
And "sets" by looking for:
- a public accessor named setSomeKey() or _setSomeKey()
- a public field named someKey or _someKey
Expressions: e.g. '${firstName + " " + lastName}' or '${pageWithName("Page2")}'
Expressions are evaluated with the AribaExpr interpreter. The syntax is Java/Groovy-like,
but properties referenced in the expressions are resolved via FieldValue (according to the
rules above)
Parent Bindings: e.g. "$^value" or "$^width:15"
Parent Bindings are used by subcomponents to resolve their value by passing the request on
to whatever binding expression the parent component bound to the named binding. If the `:'
suffix is used, the given default value is used in the case that the parent did not bind
named binding.
Localization Bindings: e.g. "$[a002]Delete Items"
Localization bindings are the binding equivalent to the AWLocal component: the localized string
is looked up in by the key in the brackets, but if it's not (yet) provided, the
supplied text is used. (Tools exist to update localization string files from the developer provided
text in these bindings)
See AWBinding for more details.
Say we want a proper GuestBook, with a list of names and associated comments. First we'll create Post.java, a simple POJO for capturing an individual post:
package app;

public class Post {
    public String userName;
    public String comment;
}
(Note: we're using public instance variable here just to keep the example concise: you can, of course, use protected or private fields and provide public accessors instead)
Now we'll change Main.java to keep track of the current "newPost" as well as the list of all posts:
public class Main extends AWComponent {
    public List _posts = new ArrayList();
    public Post _newPost = new Post();
    ...
And we'll change our Main.awl to provide a text field and text area for entering data in the newPost:
Name: <a:TextField value="$newPost.userName"/><br/>
<a:TextArea cols="50" rows="4" value="$newPost.comment"/><br/>
Note how we're using a "field path" ("$newPost.userName") to bind to the properties to be edited.
Actions
Now, how do we add a post to our post list? We write a simple action method:
public void add () {
    _posts.add(_newPost);
    _newPost = new Post();
}
And we change our SubmitButton to invoke it:
<a:SubmitButton action="$add"/>
Clicking on this button will fire our action and then, because the method is void, simply stay on the current page. However, as we'll see later, action methods can return AWComponent instances (or anything else that implements the AWResponseGenerating interface, thereby transitioning the user to another page.
Note that the action is fired in the second phase of the AWCycleable request handling cycle (invokeAction). As such, by the time the action is fired, the values have already been pushed from our TextField and TextArea into _newPost
Now how do we render all the posts?
Control Flow Elements: AWIf, AWFor
AribaWeb comes with bundled components for looping (AWFor, AWWhile, etc) and conditional inclusion (AWIf, AWElse) and you can add your own. (More on writing custom subcomponents shortly).
Let's add a repeated block for each of our post entries. We'll add this near the bottom of our Main.awl file:
<a:For list="$posts" item="$currentPost">
    <hr/>
    $currentPost.userName said:<br/>
    <i>$currentPost.comment</i>
</a:For>
Here we're repeating over the contents of our _posts List, and for each iteration we're assigning to the currentPost key. For each iteration the body of the AWFor is replicated -- in this case we're rendering the current post's userName and comment (note that we can use a "naked" $currentPost.userName -- this is
just shorthand for the equivalent <a:String>). We'll need a add a _currentPost variable to our java for assignment in the iteration:
public Post _currentPost;
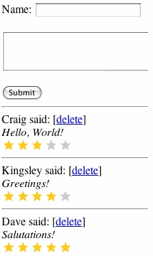
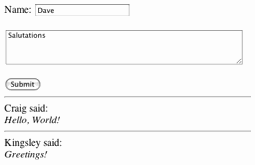 Here's the resulting UI in action:
Each time we type a new entry and click submit, our entry list is refreshed with new content and the
entry fields are cleared, ready for a fresh entry.
Actions, Part II: With Context
It's important to understand the the AWFor is not simply the equivalent to a JSP of PHP for loop, doing a "println" on it's body; In truth, the AWFor plays an important role in both output and input.
To see this, add a feature to delete a selected entry in our list. You might expect that we have to
encode the "id" of the each row and then use that in our delete method. Not so!
In our .awl just add this:
$currentPost.userName said:
[<a:Hyperlink action="$deleteCurrent">delete</a:Hyperlink>]<br/>
Then in our .java file, add this:
public void deleteCurrent () {
    _posts.remove(_currentPost);
}
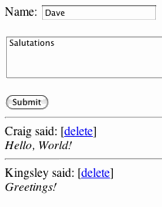
This does just what you might hope. Clicking on any of the delete links removes the entry you clicked on and refreshes the display. But how?
AribaWeb restores your component's fields to the values they had at the point the corresponding action link was originally rendered!
This last statement is critical to understanding the AribaWeb programming model: the changes to your
component state are effectively synchronized (replayed) across the three request handling phases
(renderResponse, applyValues, invokeAction) -- a link, or text field (or any other subcomponent) that
was rendered with the component hierarchy in a particular state (e.g. the _currentItem set to a particular
Post in the in the <a:For> over _posts) will see the state restored to as it was when the user subsequently acts on that UI element (by submitting values and/or invoking actions). And this is all done for you transparently.
Let's drive this point home by creating a subcomponent!
Creating Subcomponents
Programming in AribaWeb is all about creating Components. Pages are components, widgets are components,
chunks of pages (like reusable forms) are components -- everything is a component. And since creating components is not a rarefied activity in AribaWeb, it turns out to be super easy to do.
Let's say, for instance, that our Posts have a 1-5 numerical rating, and we'd like to have a rating bar next to each post that allowed each post to be rated.
We'll start by editing our Post domain object to add a rating field and default it to 3:
public class Post {
    public String userName;
    public String comment;
    public int rating = 3;
}
Then we'll create a new file for our component, RatingBar.awl:
<a:For count="$^value">#</a:For>
<a:For start="$^value" count='5'>_</a:For>
And then we can use the component by adding this additional line to Main.awl:
$currentPost.userName said:
[<a:Hyperlink action="$deleteCurrent">delete</a:Hyperlink>]
(Rating: <x:RatingBar value="$currentPost.rating"/>)<br/>
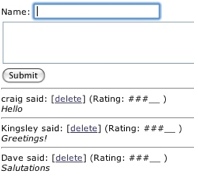 Here's what we'll see after adding a few comments:
How does it work?
- The page component (Main.awl) embeds the RatingBar component via the x:RatingBar reference and binds its value binding to the currentPost's rating (0-5).
- AW resolves x:RatingBar to the RatingBar.awl component (the "x:" namespace is the default for application-provided components).
- RatingBar.awl has two AWFor blocks, this time using the
count binding. It renders "#" from 0 to its value (accessed via $^value) and "_" from its value to 5.
Note that the "$^value" results is "pulling" the from the value binding (twice). Since our parent bound this to $currentPost.rating, this results in the evaluation of the "currentPost.rating" FieldPath, thereby extracting the appropriate rating for the current post.
Now what if we wanted to enable this subcomponent to be able to set the rating rather than just display it? That is, when the users clicks on a particular "#" or "_" we'll push the corresponding value back through our value binding.
To do this, we need to do two things:
- Keep track of the current rating value in a component field
- Push our value back on click
We could do #1 by creating a RatingBar.java or RatingBar.groovy component. But your author is feeling
lazy, so instead I'll put this logic in an inline groovy class definition. This will create a server-side class for the component, just as if we declared a normal class, it's just more concise. Here's the completed component:
<a:For count="$^value" index="$idx">
    <a:Hyperlink action="$click">#</a:Hyperlink>
</a:For>
<a:For start="$^value" count='5' index="$idx">
    <a:Hyperlink action="$click">_</a:Hyperlink>
</a:For>
<groovy>
    def idx;
    void click () { setValueForBinding(idx+1, "value"); }
</groovy>
There's a lot going on here:
- We've declared a totally reusable subcomponent and used it in a parent component where it appears multiple times on a single page.
- Our component both pulls and pushes from it's binding (i.e. we have a declarative, bidirectional binding)
- Clicking an an instance of our component updates state in the parent and refreshed the page, but the parent was entirely abstracted from the subcomponent's implementation -- it didn't have to coordinate item numbering (e.g. IDs), didn't have to coordinate request handling, form value processing, or action dispatch -- these is critical to a component model for truly encapsulated reusable components.
- We declared a AWComponent subclass in 2 lines of embedded Groovy (yes, embedding code in templates is provocative, but it sure is fun!).
Of course, our component doesn't have to look so ugly...
Managing Resources
Let's replace our "#" and "_" characters with images of a hollow and filled in star.
<a:For count="$^value" index="$idx">
    <a:ActiveImage action="$click" filename="app/star-full.gif"/>
</a:For>
<a:For start="$^value" count='5' index="$idx">
    <a:ActiveImage action="$click" filename="app/star-outline.gif"/>
</a:For>
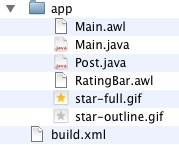
 We then add our image resource files. We can add them right to our app/ directory along with our source files. That's right, they don't need to be scattered to the far reaches of the directory tree -- you can maintain locality with the component that uses them (a sort of encapsulation) and the AW build system
will ensure that they end up in the right place to get served up at runtime.
We then add our image resource files. We can add them right to our app/ directory along with our source files. That's right, they don't need to be scattered to the far reaches of the directory tree -- you can maintain locality with the component that uses them (a sort of encapsulation) and the AW build system
will ensure that they end up in the right place to get served up at runtime.
The resolution at runtime is done for us courtesy of the AWResourceManager. The AWResourceManager
scans framework and application jars and finds both web resources (like our example gifs) and any
AWComponents (hence our ability to refer to x:RatingBar and have AW find it automatically where it happens
to reside in the java package "app".
With that change in place, our UI now looks like this:
We have a fully interactive (and half-way decent looking) subcomponent repeated in our GuestBook page!
Refresh Regions
If you were to monitor the web communication on each click on our RatingBar control you'd notice that each click,
although issued as XMLHTTP via JavaScript, was resulting in the client (unnecessarily) performing a DOM update of most of the content of the page. We can focus that update by wrapping the content to be updated in an
AWRefreshRegion:
<a:RefreshRegion>
    <a:For count="$^value" index="$idx">
        <a:ActiveImage action="$click" filename="app/star-full.gif"/>
    </a:For>
    <a:For start="$^value" count='5' index="$idx">
        <a:ActiveImage action="$click" filename="app/star-outline.gif"/>
    </a:For>
</a:RefreshRegion>
If you now used a monitoring proxy like Charles to see what content was being
returned to the client on each click, you'd be pleased to see that it's only the HTML for the one control modified
by the action! RefreshRegions are key to AribaWeb's unique "Auto AJAX" capability and are very different than
the typical AJAX integration schemes of other frameworks where you're force to specially mark "AJAX actions"
and are forced in the code on the server side to custom code your action to render a specific part of the page
and target a particular named div in the response. In AW, every action is AJAX, and with every update AW
figures out for you just which parts of the page (delimited by RefreshRegions) must be updated to bring the client
up to date.
For more on Auto AJAX make sure to watch this in-depth screencast, Auto AJAX Explained.
Page Transitions
Page navigation is of critical concern in web programming, and AribaWeb has a somewhat unique approach.
While most frameworks effectively externalize application state to the client by generating destination
information into URLs, AribaWeb provides a more secure and powerful approach based on *server side state
encapsulation.* In AribaWeb *component actions transition to other pages by allocating, initializing,
and returning other component instances* -- the destination of links or forms is in no way predestined
by content rendered to the page (and therefore an action can use server logic to respond to any action in
any way).
Let's say in our GuestBook we wanted to add an "Edit" link to edit a particular post. (I truth we'd
probably want to do this in a popup panel on the same page, but for purposes of illustration here,
we'll use a separate page).
First, we'll define a new page-level component for editing a post: EditPost.java/.awl. In natural
object-oriented form, this page will have a setter to assign to it the post to be edited:
public class EditPost extends AWComponent
{
    public Post _post;

    public void setPost (Post post) {
        _post = post;
    }
}
And use it in our template (EditPost.awl):
<a:PageWrapper hasForm="$true">
    <h1>Edit Post</h1>
    Name: <a:TextField value="$post.userName"/><br/>
    <a:TextArea cols="50" rows="4" value="$post.comment"/><br/>
    <a:SubmitButton action="$done"/>
</a:PageWrapper>
And to navigate to our new page from the list of posts on Main.awl, we add this link:
<a:For list="$posts" item="$currentPost">
    $currentPost.userName said:
    [<a:Hyperlink action="$editCurrent">edit</a:Hyperlink>]
...
And then define the action as follows:
public AWComponent editCurrent () {
    EditPost editor = pageWithClass(EditPost.class);
    editor.setPost(_currentPost);
    return editor;
}
So, what happens when then user clicks the Edit link?
- editCurrent() is invoked (with the state of _currentPost restored to correspond to the right post)
- editCurrent() uses pageWithClass() to create an instance of the destination component
- and then assigns the appropriate post instance to it
- and returns the page back to AW as the result of the response
- AW sees that it was given a new page as a response to the action and renders that new page
- However, because of AutoAJAX this "page transition" just swaps DOM content -- the browser does not need to fully refresh the page!
If we'd like, we can tighten up this code (for such a trivial navigation) using an embedded AribaExpr
expression in our action binding (and forgoing the java method in Main.java altogether):
[<a:Hyperlink
    action='${pageWithName("EditPost", [post : currentPost])}'>
 edit</a:Hyperlink>]
This uses a variant of pageWithName which takes a Map of assignments to make to the newly created
component (via FieldValue). Using AribaExpr's Groovy-like syntax for inline Maps, we affect the
call to setPost() by passing the currentPost in the map [post : currentPost].
A final question remains: how does our EditPost page component's done() action get back to the calling page?
Well, ultimately we know that all navigation is the result of returning page components, so the question reduces
to, how does the EditPost component get ahold of the original instance of Main to subsequently return it.
There are a number of options:
- EditPost could provide a setter for
returnPage and Main could assign this to it when first transitioning
to it.
- EditPost could check what page transitioned to it and store that for later use.
We'll do the latter:
AWComponent _returnPage;

public void init ()
{
    super.init();
    _returnPage = requestContext().requestPage().pageComponent();
}

public AWComponent done ()
{
    return _returnPage;
}
Note how our component now overrides the AWComponent's init() method: this is called when our page is first
created. We then use AWRequestContext to get the origin AWPage and get its root component.
(AWRequestContext is an important class to get to know for advanced AribaWeb programming; it manages the
state associated a single request cycle: i.e. from the calls to applyValues() and invokeAction() on the
origin page, to the call to renderResponse() on the outgoing page). Finally, in our done() action,
we simply return back the page that originally preceded us.
Other Areas to Explore
At the AribaWeb Core level there are a number of additional facilities that are vital to full appreciation
of the framework. Adventuresome readers will want to explore the JavaDoc and search our examples and
uses in source code to learn more:
- AWBlock / AWIncludeBlock enable declaring reusable component fragments for reuse inside a single template
- AWIncludeComponent provides the basic for totally data-driven dynamic user interfaces by enabling determining "on the fly" which component to include (by name) based on runtime logic. MetaUI, for example, uses this facility to use an appropriate widget for each field, based on that field's type (and other context).
- AWGenericElement and AWGenericContainer provide facilities for dynamically generating HTML
tags (with binding-based attribute values) and handling actions and form values associated with them.
(These primitives are the basis for most of AW's HTML elements component analogs, like
AWPopup, AWCheckbox, AWRadioButton, ...
Next up: Part II: Widgets