Wizard Framework
The wizard framework is part of the Widgets stack.
It provides a multi-page flow to guide users to perform task on a given context object.
Default navigation between these pages are provided, but can be customized.
We'll build on our GuestBook application as follows:
- Build a wizard for post creation
- Add a "Guide Me" link to launch the wizard
- Add custom action handling to the wizard
- Add validation
This guide will expose us to the following Wizard facilities:
It requires a knowledge of MetaUI and the stack that it depends on,
so make you have gone through it first.
Wizard, Steps, and Frames
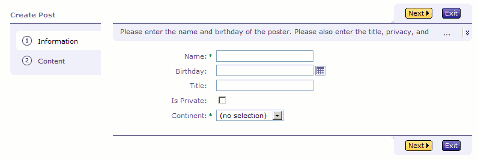
Let's start by building a simple two steps wizard.
The first step is for entering information about the post,
the second for entering the actual post comment,
and the third for exiting the wizard.

First we need to create a specification for the steps in the wizard.
Create a "wizard" directory under the application directory,
and create a wizard file named "GuestBook.awz" with the following content:
<!DOCTYPE wizard SYSTEM "Wizard.dtd">
<wizard name="CreatePost"
        label="Create Post"
        allowsClickableSteps="true">
  <doc>
    Post creation wizard.
  </doc>
  <steps>
    <step name="infoStep" label="Information">
      <frame name="infoFrame" source="Information"/>
    </step>
    <step name="contentStep" label="Content">
      <frame name="contentFrame" source="Content"/>
    </step>
  </steps>
  <exit>
    <frame name="confirmExit" source="Exit"/>
  </exit>
</wizard>
WizardMeta is the class representation of this static information,
and a Wizard instance contains the runtime information of a wizard.
The source attribute of each frame references the specification file for the frame.
Let's create a wizard frame file called "Information.afr" with the following content:
<!DOCTYPE frame SYSTEM "Frame.dtd">
<frame label="Information">
    <doc>
        This frame is the frame in the information step.
    </doc>
    <content source="wizard.Information"/>
</frame>
As you can guess, WizardFrameMeta is the class representation of this static information,
and a WizardFrame instance contains the runtime information of a wizard frame.
Similarly, create "Content.afr" like this:
<!DOCTYPE frame SYSTEM "Frame.dtd">
<frame label="Content">
    <doc>
        This frame is the frame in the content step.
    </doc>
    <content source="wizard.Content"/>
</frame>
And "Exit.afr" like this:
<!DOCTYPE frame SYSTEM "Frame.dtd">
<frame label="Exit">
    <doc>
        This frame is the frame in the exit step.
    </doc>
    <content source="wizard.Exit"/>
</frame>
The source attribute of the content element references the UI component
that will be use to render the actual wizard frame specific content.
Let's take a look what it looks like...
Wizard Context and Wizard Frame Content
We start with the first frame by creating Information.awl under the wizard directory
with this:
<w:HintMessage>
    Please enter the name and birthday of the poster.
    Please also enter the title, privacy,
    and continent of the post.
</w:HintMessage>
<m:Context object="$context" operation="create"
           layout="Inspect" frame="$frame.name">
    <m:IncludeComponent/>
</m:Context>
A few observations:
- No page wrapper component used, since the wrapper will come from the wizard
- We are using MetaUI to render the form fields
- "frame" is a context key we just made up to be used in the rules.oss later
- "$context" refers to the wizard context, not related to the MetaUI context
So where is $context and $frame coming from?
The answer is that we got them from extending the WizardFrameContent component.
So create Information.java with this:
package wizard;

import ariba.ui.wizard.component.WizardFrameContent;

public class Information extends WizardFrameContent
{
}
WizardFrameContent have accessors getContext() and getFrame().
In this case, context is the new Post object,
and frame is the runtime WizardFrame named "infoFrame."
Let's use this MetaUI context to tweak this frame in the app/rules.oss file.
We do this by specifying rules to first hide all field if frame is "any" in the context,
and then show only selected fields if frame is "infoFrame" like this:
frame class=app.Post field {
    after:zNone;
}

frame=infoFrame class=app.Post {
    field=(userName,birthday,title,isPrivate,continent) {
        after:zLeft;
    }
}
Similarily, let's create the Context frame component with Content.awl:
<w:HintMessage>
    Please enter the comment. Formatted text is support.
</w:HintMessage>
<m:Context object="$context" operation="create"
           layout="Inspect" frame="$frame.name">
    <m:IncludeComponent/>
</m:Context>
Next, in Content.java:
public class Content extends WizardFrameContent
{
}
Then, display only the comment field in this frame:
frame=contentFrame class=app.Post {
    field=comment {
        after:zLeft;
    }
}
And with that, we get this UI:
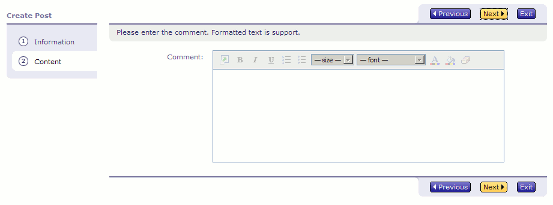
The left side of the wizard shows the steps.
The top and bottom nagivation buttons allows for going forward and backward between steps.
The exit button goes to the special exit frame.
The exit frame we leave bare for now, so create Exit.awl like this:
<w:HintMessage>
    Are you sure you want to exit?
</w:HintMessage>
And Exit.java like this:
public class Exit extends WizardFrameContent
{
}
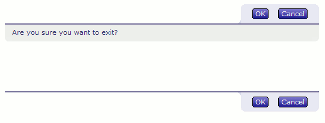
We can't actually see the wizard pages without an action to launch it.
Let's see expose the action from our main page...
Wizard Launching
In Main.awl, let's add this right below the "Welcome!" text:
<div style="float:right">
    <a:Hyperlink action="$guideAction">Guide Me</a:Hyperlink>
</div>
In Main.java, we implmenent guideAction like this:
import ariba.ui.wizard.core.Wizard;
import ariba.ui.wizard.component.WizardUtil;
...
public AWComponent guideAction ()
{
    Wizard wizard = new Wizard
        ("wizard/GuestBook", _newPost, resourceManager());
    return WizardUtil.startWizard(wizard, requestContext());
}

We create a Wizard instance with the location of the .awz file,
and pass in the post object as the wizard context.
WizardUtil creates the WizardPage that contains the first WizardFrame.
Wizard Actions and Wizard Action Targets
Let's enhance our wizard with a couple more steps: Rating and Summary.
We add a rating frame to display the optional rating field.
So in GuestBook.awz, add this:
<step name="ratingStep" label="Rating">
  <frame name="ratingFrame" source="Rating"/>
</step>
And add Rating.afr with this:
<!DOCTYPE frame SYSTEM "Frame.dtd">
<frame label="Rating">
    <doc>
        This frame is the frame in the rating step.
    </doc>
    <content source="wizard.Rating"/>
</frame>
Then, add Rating.awl with this:
<w:HintMessage>
    Please enter the default rating of the post.
</w:HintMessage>
<m:Context object="$context" operation="create"
           layout="Inspect" frame="$frame.name">
    <m:IncludeComponent/>
</m:Context>
Next, add Rating.java with this:
package wizard;

import ariba.ui.wizard.component.WizardFrameContent;

public class Rating extends WizardFrameContent
{
}
Finally in rules.oss, add this:
frame=ratingFrame class=app.Post {
    field=rating {
        after:zLeft;
    }
}
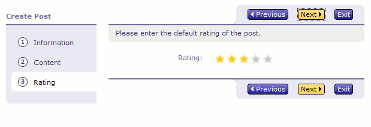 The Rating step is not too interesting,
but let's make the Summary step more interesting by adding a custom save button
on the navigation bars.
In GuestBook.awz, we specify the summary step and a save action:
<actions>
    <action name="save"
            label="Save"/>
</actions>
<steps>
    ...
    <step name="summaryStep" label="Summary">
      <frame name="summaryFrame" source="Summary"/>
    </step>
</steps>
WizardActionMeta is the class representation of this static information,
and a WizardAction instance contains the runtime information of a wizard.
In Summary.afr, we reference the save action:
<!DOCTYPE frame SYSTEM "Frame.dtd">
<frame label="Summary">
    <doc>
    This frame is the frame in the summary step.
    </doc>
    <actions>
        <action name="save"/>
    </actions>
    <content source="wizard.Summary"/>
</frame>
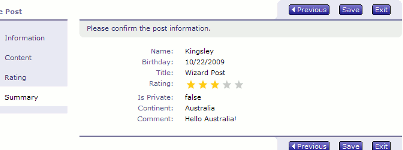
In Summary.awl, we change operation to "view", and leave out frame context key
so all the fields gets displayed:
<w:HintMessage>
    Please confirm the post information.
</w:HintMessage>
<m:Context object="$context" operation="view" layout="Inspect">
    <m:IncludeComponent/>
</m:Context>
Each frame component gets to intercept and process the wizard actions when it fires.
This is done by overriding the actionClicked method from WizardFrameContent.
The actionClicked passing in a WizardAction, and returns a WizardActionTarget.
WizardActionTarget represents the destination for a wizard action.
We can process the save action like this in Summary.java:
package wizard;

import ariba.ui.wizard.core.WizardActionTarget;
import ariba.ui.wizard.core.WizardAction;
import ariba.ui.wizard.component.ComponentActionTarget;
import ariba.ui.wizard.component.WizardFrameContent;
import ariba.ui.aribaweb.core.AWComponent;
import app.Post;
import app.Main;

public class Summary extends WizardFrameContent
{
    public WizardActionTarget actionClicked (WizardAction action)
    {
        if ("save".equals(action.getName())) {
            Post.Posts.add(getContext());
            return mainPageActionTarget();
        }
        return super.actionClicked(action);
    }

    protected WizardActionTarget mainPageActionTarget ()
    {
        AWComponent mainPage = pageWithName(Main.class.getName());
        return new ComponentActionTarget(getFrame().getWizard(),
                              mainPage,
                              true);
    }
}
We check the name of the WizardAction, and add the new post,
and then return a ComponentActionTarget. The last flag to ComponentActionTarget
marks the wizard to be terminated.
This has the effect of cleaning up the references in the wizard instance,
and removing the page history of the wizard frames, so the user cannot backtrack into them.
We can also return another WizardFrame. We'll do that in the content step.
So in Content.java, we check if it is the "next" action,
and skip to the summary frame if the post is private:
public WizardActionTarget actionClicked (WizardAction action)
{
    Wizard wizard = getFrame().getWizard();
    if (wizard.next == action) {
        Post post = (Post)getContext();
        if (post.isPrivate) {
            return wizard.getFrameWithName("summaryFrame");
        }
    }
    return super.actionClicked(action);
}
Let's go back to the exit frame and add a delete action.
So add this to GuestBook.awz:
<action name="delete"
        label="Delete"/>
But instead of adding it to the navigation bars,
we reference it using the WizardAction UI component
<ul>
    <li>
        <w:WizardAction name="save">
           Save
        </w:WizardAction> $context.title
    </li>

    <li>
        <w:WizardAction name="delete">
           Delete
        </w:WizardAction> $context.title
    </li>

    <li>
        <w:WizardAction name="ok">
            Continue
        </w:WizardAction> working on $context.title
    </li>
</ul>
We process the delete action by simply returning to the main page and terminating the wizard.
public class Exit extends Summary
{
    public WizardActionTarget actionClicked (WizardAction action)
    {
        if ("delete".equals(action.getName())) {
            return mainPageActionTarget();
        }
        return super.actionClicked(action);
    }
}
 Notice that Exit extends Summary so we can resue the processing for the save action.
Like "previous" and "next", the exit frame The "ok" and "cancel" actions are also prefined actions in Wizard.
Validation
We'll finish this guide by adding validation to the information frame
with a call to the AWErrorManager in Information.java:
public WizardActionTarget actionClicked (WizardAction action)
{
    if (errorManager().checkErrorsAndEnableDisplay()) {
        return getFrame();
    }
    return super.actionClicked(action);
}
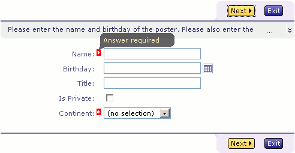
We need to need to return the frame we are currently in instead of null,
since the default action target is either the next frame or the exit frame.
Other Areas to Explore
This guide should give you a good idea of the wizard framework
and how similar frameworks can be on top of the AribaWeb stack.
You can view the complete scheme for the .awz and .afr in
Wizard.dtd
and
Frame.dtd.
You can also take a look at
WizardPage, WizardPageWrapper, WizardNavigator and related class to see the wrapper is constructed.
Back to Documentation